Tutorial : Make Your Own Cursor (Photoshop)

Assalamualaikum and annyeong. Okayy tuto yang seterusnya tieqa nak tunjukkan cara untuk buat own cursor. Means kita boley buat cursor kita sendiri dengan menggunakan software photoshop. Let's begin.
1. Before korg start. Firstly, korg kena cari cursor yang korg suka dulu . Yang itu bole cari dekat SINI.
2. Then buka Photoshop. File > New
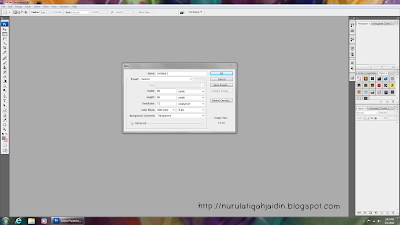
3. Tetapkan saiz mengikut citarasa korg. Tapi makesure jgn buat saiz tu terlalu besar ye. Jgn lupa for Background Content tukarkan kepada Transparent. kemudian click OK.
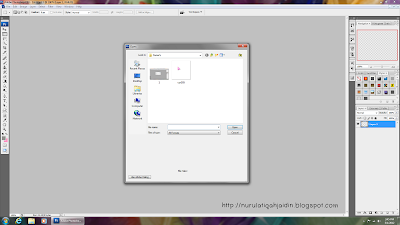
4. Next, File > Open > Select cursor yang korg save tadi.

5. Sebelum korg move cursor tu ke bahagian layer. Kita mesti cut cursor tu terlebih dahulu. Lihat contoh di atas untuk cut cursor. Bila sudah korg pegi ke Edit > Cut
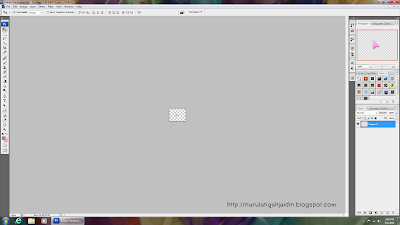
6. Kemudian, pergi ke new layer then click Edit > Paste

7. Lepas tu, untuk tambahkan ayat dekat cursor tuh. Korg click simbol 'T' then bole la tulis ayat korg sendiri. Boley tgk contoh kat atas ni.

8. Bila dah habis edit. korg boleh la save. Click File > Save As
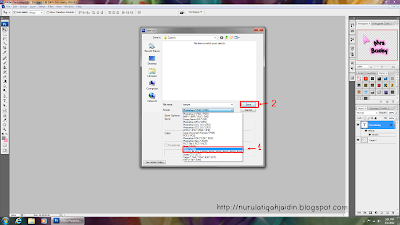
9. Ha! jap! Sebelum save. Pastikan korg tukarkan format kepada PNG. Then, baru la boleh save.

DONE :)


7 comment [s]:
nak tanya ada x tuto yg buat curosr cam nih http://nurulatiqahjaidin.blogspot.com/2012/04/freebies-cursor-kpop-artist.html
@Lyn: Ni la tutonya. :)
sama je Lyn.
Salam. Tengsvm jadi dah cursor !
selalunya saiz apa yg sesuai? err sy dah jumpa tuto ni :D
Ahhhh! Tak pndai buat :( Susah nyeee
nak tanye..knpe kt photoshop tu sye dh tkn open untuk mskkn cursor yg dh dowhload tu tpi x blh ltk kt photoshop tu knpe ek?
Macam mana nak letak kat blog akak?
Post a Comment